 |
|
 |
|||||||

Forum für die Fotosysteme von Sony und KonicaMinolta |
|
|
|
|
|||||||||||||||
|
||||||||||||||||
 18.02.2006, 01:43
|
#21 |
|
Gesperrt
Registriert seit: 01.10.2004
Ort: 3 Km vom Highway to Love entfernt.
Beiträge: 8.460
|
Hallo Mark,
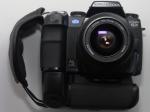
ich habe in Köln auf dem Stammtisch meinen BP-400 an eine D5D gehalten, bzw. den "Stöpsel" des BP-400 in den Akkuschacht gesteckt. Die Kamera bekam sogar Strom! Ohne Umbau! Allerdings war der Abstand nicht prickelnd, aber das ist ja bekannt. Deine Idee ist super! Die notwendigen Umbauarbeiten dürften wirklich überschaubar sein. |

|

|
| Sponsored Links | |
|
|
|
|
19.02.2006, 21:17
|
#22 | ||
|
Themenersteller
Registriert seit: 25.01.2004
Ort: Ruhrgebiet
Beiträge: 242
|
Zitat:
Zitat:
Als erstes wird der Griff zerlegt. Dazu werden alle Schrauben entfernt, alle sichtbaren auf der Metallplatte und unter dem Boden. Auch die Zwei unter dem Gummi an der Front nicht vergessen. Unter der Metallplatte sieht man vier Schrauben, mit denen der Turm befestigt ist. Raus damit. Nun wird der Bürzel der Kameraauflage abgefeilt. Vorsicht! Nicht zu viel abfeilen, es bleibt nur wenig Material übrig! Der Turm wird mit Säge oder Feile unten um 2mm gekürzt. ACHTUNG!!! Die Kabel müssen z.B. mit Tape geschützt werden, damit eine abrutschende Säge sie nicht beschädigt. Jetzt wird die Stelle für die neue Stativschraubenbohrung ermittelt. Dazu bauen wir alles wieder provisorisch zusammen, die Stativschraube lassen wir draussen. Die 11Uhr-, die 1Uhr-, und die 5Uhr-Schraube zur Turmbefestigung lassen wie ebenfalls raus, damit der Turm beim Einbau etwas gedreht werden kann. Nun kann der BP-400 unter das Gehäuse gehalten werden, um die Lage der neuen Bohrung zu markieren. Jetzt alles auseinanderbauen, das Loch bohren, zusammen bauen und mit oben aufgelegter Stativschraube die Lage des neuen Schlitzes an der Gehäusevorderseite markieren. Erneut auseinander bauen, den neuen Schlitz aussägen, die Stativschraube an die neue Stelle legen und markieren, wo die Stege darunter gekürzt werden müssen. Beim Kürzen mit einem Cuttermesser auf Finger und Kabel aufpassen, da ist nicht viel Platz!!!! Beim Zusammenbau passt die grosse Unterlegscheibe nicht mehr auf die Stativschraube, ist aber nicht schlimm. Jetzt noch einmal die Vorsichtshinweise: Ich übernehme keine Garantie für Griff, Kamera oder körperliche Unversehrtheit! Benutzt nur bestes Werkzeug, vor allem bei den kleinen Schrauben. Ein Mal abrutschen kann den Kreuz-Schlitz-Kopf bereits ruinieren! So, nun wünsche ich Euch viel Erfolg! Mark |
||
|
|
|
|
19.02.2006, 23:16
|
#23 | |
|
Registriert seit: 17.07.2005
Ort: D-82110 Germering
Beiträge: 286
|
Zitat:
__________________
Gruß wico ...auch der längste Weg beginnt mit dem ersten Schritt... ;-) -------->meine FC-Bilder<------- |
|
|
|
|
|
19.03.2006, 01:00
|
#24 |
|
Registriert seit: 19.03.2006
Beiträge: 3
|
First of all: this IS a great thread!
Secondly: I hope you don't mind my English? Third of all: I'm having some questions... The tutorial Mark wrote is pretty clear to me, my German isn't that bad. Still I couldn't make out the following: - how do you remove the battery cap? I mean that thing that flips open and lets you put in or out your battery ? - How is the grip attached to the body?As long I understand, the bolt in replaced ? Please some explanation... - Does the shutter button actually work without modification? Or do you have to do the "remote mod"? (Integrating the remote in the grip and linking this to the remote jack) I'd love some more pictures, I'm very excited about this! Thank you very much! |
|
|
|
|
19.03.2006, 21:06
|
#25 |
|
Themenersteller
Registriert seit: 25.01.2004
Ort: Ruhrgebiet
Beiträge: 242
|
hello ruRuh and sorry about my rusty english.
My sister is working on a translation witch will be the answer to all your questions. Mark (leckofanni, ist das lange her) |
|
|
|
| Sponsored Links | |
|
|
|
|
20.03.2006, 01:58
|
#26 | |
|
Registriert seit: 19.03.2006
Beiträge: 3
|
Zitat:
|
|
|
|
|
|
20.03.2006, 07:45
|
#27 |
|
Themenersteller
Registriert seit: 25.01.2004
Ort: Ruhrgebiet
Beiträge: 242
|
Dear guRuh,
These conversion instructions should answer all your questions: First dismantle the handle. In order to do this remove all the screws, all visible ones on the metal plate and those underneath the bottom. Don't forget the two under the rubber at the front. You can see four screws under the metal plate, where the tower is connected. Get them out. Now file down the tail end of the camera rest. Careful! Don't file off too much, there is not a lot of material left! Shorten the tower with a saw or a file at the bottom by about 2mm. WARNING!!! Protect the cables with tape so that a slipping saw doesn't damage them. Now establish the new place for the tripod screw hole. In order to do this, reassemble everything, but leave the tripod screw off. Also leave off the 11 o'clock , the 1 o'clock and the 5 o'clock screw for the tower attachement, so that the tower can be turned a little during assembly. You can now hold the BP-400 under the camera-body, so that you can mark the new drill hole. Now disassemble everything, drill the hole, and reassemble everything again. Put the tripod screw on top to mark the location of the new slit on the front of the body. Disassemble again, cut the new slit, put the tripod screw in the new place and mark the places where the bars below have to be shortened. When cutting, watch out for cables and finders, there is not a lot of space!! If you want to utilise the portrait release, thread a remote release cable through a drill hole on the side of the BP-400 and solder it to the release contacts. This remote release is later pushed connected to the relevant jack in the camera housing. The large washer is not going to fit on to the tripod screw during final assembly, don't worry about that. Now again the safety notice: I give no guarantees regarding grip, camera or your fingers! Use only the best tools, specially with small screws. Slipping one time can ruin the Phillips screw head. Wishing you good luck in your endeavour, Mark |
|
|
|
|
20.03.2006, 12:50
|
#28 |
|
Registriert seit: 19.03.2006
Beiträge: 3
|
Viel dank!
I'll try the mod, and I'll post the result here |
|
|
|
|
07.06.2006, 18:26
|
#29 |
|
Registriert seit: 07.06.2006
Ort: Lünen
Beiträge: 2
|
@ Markloecker
Du sagst, dass es nicht so schwierig ist. Wie genau definierst du "nicht so schwierig"?
Spiele gerade mit dem Gedanken, mir auch eine D5D zu holen. Nur die Tatsache, dass es keinen Batteriegriff gibt, die stört mich doch sehr, weil ich den Komfort meiner A1 gewohnt bin. Gruß, Daniel |
|
|
|
|
07.06.2006, 20:10
|
#30 |
|
Themenersteller
Registriert seit: 25.01.2004
Ort: Ruhrgebiet
Beiträge: 242
|
tjaaaaa, wie soll ich es beschreiben?
Bist Du ein Tüftler+Bastler mit Nerven und handwerklichem Geschick? Wenn "ja", dann trau' Dich. Meine Frau sagt: "Sag' Ihm, ich könnte es auch". Wenn Dir das hilft. Vielleicht meldet sich ja noch Jemand, der sich dran getraut hat? A2Freak? guRuh? wico? Mark |
|
|
|
| Sponsored Links | |
|
|
|

|
| Themen-Optionen | |
| Ansicht | |
|
|


 Linear-Darstellung

